
Announcement
We are moving to Friendster.click
Join us: www.friendster.click/join-friendster
We're also on discord.
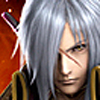
[TUTORIAL][PHOTOSHOP] Expert: Swirling Aura
![[TUTORIAL][PHOTOSHOP] Expert: Swirling Aura](http://i82.photobucket.com/albums/j249/vanraid8/Ftalk%20PS%20tutorial%20Swirling%20Aura/P21.jpg "[TUTORIAL][PHOTOSHOP] Expert: Swirling Aura")
[TUTORIAL][PHOTOSHOP] Expert: Swirling Aura
[quote][b]Introduction:[/b]
Learn how to add a stunning beam of light that twirls around the object. This tutorial is more than a beam of light, it contains steps to create three versions of the aurora effect.
[b]Creating the path[/b]
Start with a photo of a person or object that you would like to add the effect to.
[align=center][img]http://i82.photobucket.com/albums/j249/vanraid8/Ftalk%20PS%20tutorial%20Swirling%20Aura/P1.jpg[/img][/align]
Go to[b] Layer > New > Layer[/b] to create a new layer. Name this layer [b]Light Swirl.[/b]
[align=center][img]http://i82.photobucket.com/albums/j249/vanraid8/Ftalk%20PS%20tutorial%20Swirling%20Aura/P2.jpg[/img][/align]
Select the [b]Pen tool[/b] and chose the [b]Paths button.[/b]
[align=center][img]http://i82.photobucket.com/albums/j249/vanraid8/Ftalk%20PS%20tutorial%20Swirling%20Aura/P3.jpg[/img][/align]
With the pen tool, start from the bottom or the top and draw a path similar to the image below. Or you may experiment with your own path for your own unique effect, but for the first time, we recommend using the path pattern shown below.
[align=center][img]http://i82.photobucket.com/albums/j249/vanraid8/Ftalk%20PS%20tutorial%20Swirling%20Aura/P4.jpg[/img][/align]
[b]Stroking the path[/b]
Select the[b] brush tool[/b] and use the setting below. Depending on your image size, you may want to select a larger or smaller brush size. A good rule of thumb is for ever 100 pixels wide or tall, there should be 1 pixel. For example, on a 800x600pixel image, you would start off with a 8 px brush size.
[align=center][img]http://i82.photobucket.com/albums/j249/vanraid8/Ftalk%20PS%20tutorial%20Swirling%20Aura/P5.jpg[/img][/align]
Select white as the[b] foreground color[/b]. To do this quickly, simply press D then X. Pressing D will reset the colors to black and whiter and pressing X will switch the two colors.
[align=center][img]http://i82.photobucket.com/albums/j249/vanraid8/Ftalk%20PS%20tutorial%20Swirling%20Aura/P6.jpg[/img][/align]
Select back the[b] Pen tool[/b] and right mouse click on the image to display the path option menu. Select [b]Stroke Path.[/b]
[align=center][img]http://i82.photobucket.com/albums/j249/vanraid8/Ftalk%20PS%20tutorial%20Swirling%20Aura/P7.jpg[/img][/align]
A window will appear where you can select the settings. Use the settings below:
[align=center][img]http://i82.photobucket.com/albums/j249/vanraid8/Ftalk%20PS%20tutorial%20Swirling%20Aura/P8.jpg[/img][/align]
This is what your image should look like now. The path you created earlier should be stroked with a brush and it should start thin on the ends and thick in the middle. If it's all just one straight line, make sure that you have the [b]"Simulate Pressure" [/b]option checked in the previous step. If you forgot to do that or if the brush size is too small or large, go to [b]Edit > Undo[/b] to undo the previous step and correct the setting. If you want to change the stroke size, select back the brush tool and change the brush size. You may also undo and experiment with other brush shapes and settings, but we recommend, if you're doing this for the first time, sticking with one that will produce the similar results as the image below.
[align=center][img]http://i82.photobucket.com/albums/j249/vanraid8/Ftalk%20PS%20tutorial%20Swirling%20Aura/P9.jpg[/img][/align]
Now we'll add some[b] lighting effects to the stroke[/b]. To do this, we'll use the Outer Glow layer style. Right mouse click on the[b] Light Swirl layer[/b] and go to[b] Blending Options[/b]. Enable Outer Glow and select blue as the color. Adjust the spread and size to get the results that you desire.
[align=center][img]http://i82.photobucket.com/albums/j249/vanraid8/Ftalk%20PS%20tutorial%20Swirling%20Aura/P10.jpg[/img][/align]
Your swirl should now have a blue glow around it and look like light instead of paint.
[align=center][img]http://i82.photobucket.com/albums/j249/vanraid8/Ftalk%20PS%20tutorial%20Swirling%20Aura/P11.jpg[/img][/align]
[b]Masking the light[/b]
Add a layer mask to the current layer with the swirl. To do this, go to[b] Layer > New Layer Mask > Reveal All. [/b]
[align=center][img]http://i82.photobucket.com/albums/j249/vanraid8/Ftalk%20PS%20tutorial%20Swirling%20Aura/P12.jpg[/img][/align]
With the layer mask selected, use the [b]Eraser tool[/b] to erase every other line intersecting the person or object so that the light looks like it is going around.
[align=center][img]http://i82.photobucket.com/albums/j249/vanraid8/Ftalk%20PS%20tutorial%20Swirling%20Aura/P13.jpg[/img][/align]
Once you are done, you should get [b]a 3D effect[/b] similar to the image below.
[align=center][img]http://i82.photobucket.com/albums/j249/vanraid8/Ftalk%20PS%20tutorial%20Swirling%20Aura/P14.jpg[/img][/align]
[b]Adding the aurora special effect[/b]
If you like the effect and want to keep it that way, you may skip to step 20. However, if you want to add an aurora effect to the light, continue with the tutorial. Press[b] Ctrl+J or go to Layer > Duplicate Layer to create a duplicate layer. [/b]
[align=center][img]http://i82.photobucket.com/albums/j249/vanraid8/Ftalk%20PS%20tutorial%20Swirling%20Aura/P15.jpg[/img][/align]
Rotate the image 90 degrees CW by going to[b] Image > Rotate > 90 degrees CW[/b]. We need to rotate it for the Wind filter that we will be using later. The Wind filter only adds a wind effect moving left or right and not up or down; therefore, we need to rotate the image and rotate it back after applying the Wind filter if we want it to blow up or down.
[align=center][img]http://i82.photobucket.com/albums/j249/vanraid8/Ftalk%20PS%20tutorial%20Swirling%20Aura/P16.jpg[/img][/align]
Go to [b]Filter > Stylize > Wind[/b]. Go to the next step and do not click OK yet.
[align=center][img]http://i82.photobucket.com/albums/j249/vanraid8/Ftalk%20PS%20tutorial%20Swirling%20Aura/P17.jpg[/img][/align]
Choose one of the three effects from below that you would like to use. Then, follow the corresponding instruction for each.
[align=center][img]http://i82.photobucket.com/albums/j249/vanraid8/Ftalk%20PS%20tutorial%20Swirling%20Aura/P18.jpg[/img][/align]
[b]Effect A[/b]
[spoiler]1. In the Wind filter settings, choose From the left and then click OK.
2. Press [b]Ctrl+F[/b] to repeat the previous filter until you get the effect that you want.
3. Go[b] Image > Rotate > Arbitrary[/b] and enter in[b] 270 degrees CW[/b] to rotate the image back to the proper orientation.[/spoiler]
[spoiler][b]Effect B[/b]
1. In the Wind filter, choose either From the Left or From the Right; either one is fine.
2. Go to [b]Image > Rotate > 90' CW. [/b]
3. Press [b]Ctrl+F[/b] to repeat the Wind filter.
4. Repeat [b]steps 2 and 3 twice.[/b] Your image should now be back to its proper orientation.[/spoiler]
[spoiler][b]Effect C [/b]
1. Choose From the Right in the Wind filter settings.
2. Press [b]Ctrl+F[/b] several times until you get the effect that you like.
3. Go to[b] Image > Rotate > Arbitrary[/b] and enter in[b] 270 degrees CW[/b] to rotate the image back to the proper orientation.[/spoiler]
< photo. the with layer bottom or Background duplicating by Start swirl. light from coming lighting blue reflect to image tint a add we'll below, steps In surrounding. affecting isn't swirl because real so look doesn't it swirl, we>
[align=center][img]http://i82.photobucket.com/albums/j249/vanraid8/Ftalk%20PS%20tutorial%20Swirling%20Aura/P19.jpg[/img][/align]
Select the new layer (2nd layer) and go to Filter > Render > Lighting Effects. From the Style menu, choose Blue Omni and click OK. Reduce the opacity of the current layer to about 50%.
[align=center][img]http://i82.photobucket.com/albums/j249/vanraid8/Ftalk%20PS%20tutorial%20Swirling%20Aura/P20.jpg[/img][/align]
[b]Finished Results [/b]
Here's what the image looks like after adding this Photoshop effect. This effect is great for making dull photos that sometimes doesn't make much sense into a high-tech digital art.
[align=center][img]http://i82.photobucket.com/albums/j249/vanraid8/Ftalk%20PS%20tutorial%20Swirling%20Aura/P21.jpg[/img][/align][/quote]
[b]Source File:[/b] From our office

