
Announcement
We are moving to Friendster.click
Join us: www.friendster.click/join-friendster
We're also on discord.
[TUTORIAL][PHOTOSHOP]Improve Picture Quality: Color Correction
![[TUTORIAL][PHOTOSHOP]Improve Picture Quality: Color Correction](http://i82.photobucket.com/albums/j249/vanraid8/Ftalk%20PS%20tutorial%20Color%20Correction/P1.jpg "[TUTORIAL][PHOTOSHOP]Improve Picture Quality: Color Correction")

[TUTORIAL][PHOTOSHOP]Improve Picture Quality: Color Correction
[quote][b]First you will need to re-sample the image size[/b]
Open your RGB image in Photoshop. Go to Image in menu bar and select duplicate. It's alway better to work from a duplicate and keep the original in case you need to revert back. Leave the original open as it often helps to use as a reference during editing of the duplicate. Most likely your photo whether it is scanned or captured digitaly needs to be resized, follow these four steps in order to re-sample your image.
[b]1)[/b] go to and[b] Image > Image Size > un-check the Resample Image box[/b]. This is a very large JPEG file width 36 height 54. So scaling down will help to compact for a sharper image.
[align=center][img]http://i82.photobucket.com/albums/j249/vanraid8/Ftalk%20PS%20tutorial%20Color%20Correction/P2.jpg[/img][/align]
The top part of the dialog box[b] "Pixel Dimensions"[/b] simply refers to the raw data, The[b] "Document Size"[/b] has to do with how you are going to resolve the photo, or how you are going to print it. Always leave on Scale Styles and Constrain Proportions
[b]2)[/b] Change Resolution to 300DPI, image width and height will scale down in Document Size.
[align=center][img]http://i82.photobucket.com/albums/j249/vanraid8/Ftalk%20PS%20tutorial%20Color%20Correction/P3.jpg[/img][/align]
[b]3)[/b] Click back on Resample Image and re-check the check box
[b]4[/b]) resize your image down to desired size and click OK.
[align=center][img]http://i82.photobucket.com/albums/j249/vanraid8/Ftalk%20PS%20tutorial%20Color%20Correction/P4.jpg[/img][/align]
[b]Leave Constration Porpotions ON
Bicubic Smoother is ideal for making images larger
Bicubic Sharper for making images smaller
make sure you save often along the way!
[/b]
[b]Sharpen the image[/b]
Next go to filter, click on Sharpen and then select Unsharp Mask, in the diolog box click on 10% and leave the rest of options at default levels, click OK. This helps to sharpen the photo a bit overall.
Here are the basic steps I follow to get the correct color using Curves. It is an easy technique once you get the hang of it.
[b]1)[/b] Open your RGB image if it is not already,
[b]2)[/b] Go to the [b]image menu > under Adjustments > choose Curves[/b] (Command+m)
[b]3)[/b] First we need to set a few Preferences, In the Curves dialog box you will see three eyedropper icons, double click on the black one (on the left) it will then open another dialog box where you set the target shadows. Here enter values that will help remove any extra colors your digital image has in the shadows.
Enter these values in boxes, (you can tab threw these)
[b]R 20
G 20
B 20[/b]
[align=center][img]http://i82.photobucket.com/albums/j249/vanraid8/Ftalk%20PS%20tutorial%20Color%20Correction/P5.jpg[/img][/align]
then press OK, and it takes you back to the Curves dialog box. 4) Now click on the white eyedropper (on the right) to set the target hightlight color. This makes the hightlight areas nuetral. Enter these values for:
[b]4)[/b] Now click on the white eyedropper (on the right) to set the target hightlight color. This makes the hightlight areas nuetral.
Enter these values for:
[b]R 244
G 244
B 244
[/b]
[align=center][img]http://i82.photobucket.com/albums/j249/vanraid8/Ftalk%20PS%20tutorial%20Color%20Correction/P6.jpg[/img][/align]
[b]5)[/b] Now click on the grey eyedropper to set the midtones (target midtone)
Enter these values for:
[b]R 133
G 133
B 133[/b]
[align=center][img]http://i82.photobucket.com/albums/j249/vanraid8/Ftalk%20PS%20tutorial%20Color%20Correction/P7.jpg[/img][/align]
then press OK, and it takes you back to the Curves dialog box.
[b]6)[/b] Now with these values set, we can determine where the shadows, midtones, and highlight areas are and then click the eyedropper tool in the correct spot. Start with the black eyedropper first, and find an area in the photograph that is black or darkest. If the photo does not have a specific black or dark area you then have to determine that area with a simple photoshop technique (step 8) that tells you where the darkest area of your image is.
[b]7)[/b] If Curves is open, press OK and a Photoshop warning will ask you to to "Save the new target colors as defaults?" click yes.
[b]8)[/b] Start by finding the darkest shadow area, to do this go to the little black and white icon in the layers palette, and select Threshold (second up from bottom).
[align=center][img]http://i82.photobucket.com/albums/j249/vanraid8/Ftalk%20PS%20tutorial%20Color%20Correction/P8.jpg[/img][/align]
Photoshop creates a new layer changing your photo to black and white. Now use the slider under histogram and move arrow all the way to the left so photo turns all white, when you move the slider to the right slightly Photoshop will begin to reveal the darkest areas first. So we need to mark this area for later, Click OK to close Threshold and create a new adjustment layer.
[align=center][img]http://i82.photobucket.com/albums/j249/vanraid8/Ftalk%20PS%20tutorial%20Color%20Correction/P9.jpg[/img][/align]
[b]9)[/b] Now use the Color Sampler tool to mark the darkest shadow, go to the eyedropper tool and in the fly out menu, select the Color Sampler Tool.
[align=center][img]http://i82.photobucket.com/albums/j249/vanraid8/Ftalk%20PS%20tutorial%20Color%20Correction/P10.jpg[/img][/align]
Make sure you are on the threshold layer, Click on the area that is the darkest based on what was shown first by the slider and a target cursor will be placed, to mark the darkest spot.
[align=center][img]http://i82.photobucket.com/albums/j249/vanraid8/Ftalk%20PS%20tutorial%20Color%20Correction/P11.jpg[/img][/align]
An info palette will appear, but we don't need this so just close it. That target stays on top of image and we will use this target spot later. In the mean time leave the curves dialog box open. Don't worry you can clear the Sampler Target later.
[b]10)[/b] Now find the highlights using the same technique. Go to the layers palette and select threshold, and move the slider this time all the way to the right. Now slowly move the slider to the left and you will gradually see areas of white appear. These areas are your highlights. Go to the tool bar and select the eyedropper hold down for fly out menu and select the Color Sampler Tool again use this to mark the spot that represents the best highlight area.
[align=center][img]http://i82.photobucket.com/albums/j249/vanraid8/Ftalk%20PS%20tutorial%20Color%20Correction/P12.jpg[/img][/align]
[b]11)[/b] Trash the two threshold layers. Click Yes on Warning dialog. There will now be two target markers on your photo.
[b]12)[/b] Next, bring up the curves dialog by pressing command (control) + M. Select the black eyedropper tool the one on the left. Move eyedropper outside of dialog and select directly on top of target number 1. When you click on the target the shadow areas will be corrected. After doing this your photo might not look exactly right, you may not have selected the the right shadow point, but now problem, just keep clicking in the darkest areas, until it looks right. If you have to get closer to find darkest regions, use the magnifined tool (command + spacebar + click).
[b]13)[/b] While still in the curves dialog box, click on the white eyedropper the one on the right to assign your highlight area, move the cursor over the number 2 target and click on to correct the highlight areas.
[b]14)[/b] Now to correct the midtones, you will have to eye this one, start by clicking on the grey eyedropper - the one in the middle, look around photo for a medium grey, and select, doing this corrects the mid tones. sometimes it's easier to use the magnifined tool to find the mid grey (command + spacebar + click).
[align=center][img]http://i82.photobucket.com/albums/j249/vanraid8/Ftalk%20PS%20tutorial%20Color%20Correction/P13.jpg[/img][/align]
[b]Not all photos have a medium grey so it might not be possible to correct the midtones.[/b]
[b]15)[/b] While still in the curves dialog, click on the center black line of the curve and drag it up a little to brighten up the midtones. This is a little tweak done visually to help brighten and bring out the midtones. When it is right click on OK.
[align=center][img]http://i82.photobucket.com/albums/j249/vanraid8/Ftalk%20PS%20tutorial%20Color%20Correction/P14.jpg[/img][/align]
So What we have just done is applied a correction to highlights, midtones, and shadows removing any color casts your camera may have intoduced and brighted the overall contrasts.
[b]16)[/b] To remove the Target Color Sampler marks (in CS3 , click on the eyedropper, go to top bar and click on clear)
[align=center][img]http://i82.photobucket.com/albums/j249/vanraid8/Ftalk%20PS%20tutorial%20Color%20Correction/P15.jpg[/img][/align]
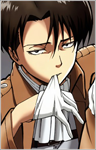
Here is the before and after.
[b]Result:[/b]
[align=center][img]http://i82.photobucket.com/albums/j249/vanraid8/Ftalk%20PS%20tutorial%20Color%20Correction/P1.jpg[/img][/align][/quote]
[b]Source File:[/b] From our office


Re: [TUTORIAL][PHOTOSHOP]Improve Picture Quality: Color Correction
[quote=sj0405;#165571;1339587246]Nice tutorial Share more[/quote]
Sure, why not...
it will take time to share them all because of limited time.
[spoiler]Repu back is good to have one  [/spoiler]
[/spoiler]
- Natsume
- » FTalkAgent


 Optimum Pride
 Team Savage
 2123
2123 207
207 2021-12-17
Re: [TUTORIAL][PHOTOSHOP]Improve Picture Quality: Color Correction
wow  nice tutorial again mr.vanraid
  very cool, great for photo retouching
  thanks for sharing and keep sharing
nice tutorial again mr.vanraid
very cool, great for photo retouching
thanks for sharing and keep sharing
- kite
- is clinically dead for 16 hrs.

- » FTalkFreak

- Se7en Deadly Sins
- 1944
- 228
- Website
Re: [TUTORIAL][PHOTOSHOP]Improve Picture Quality: Color Correction
another knowledge has been added to my coconut shell  Thanks for sharing this dude
Thanks for sharing this dude